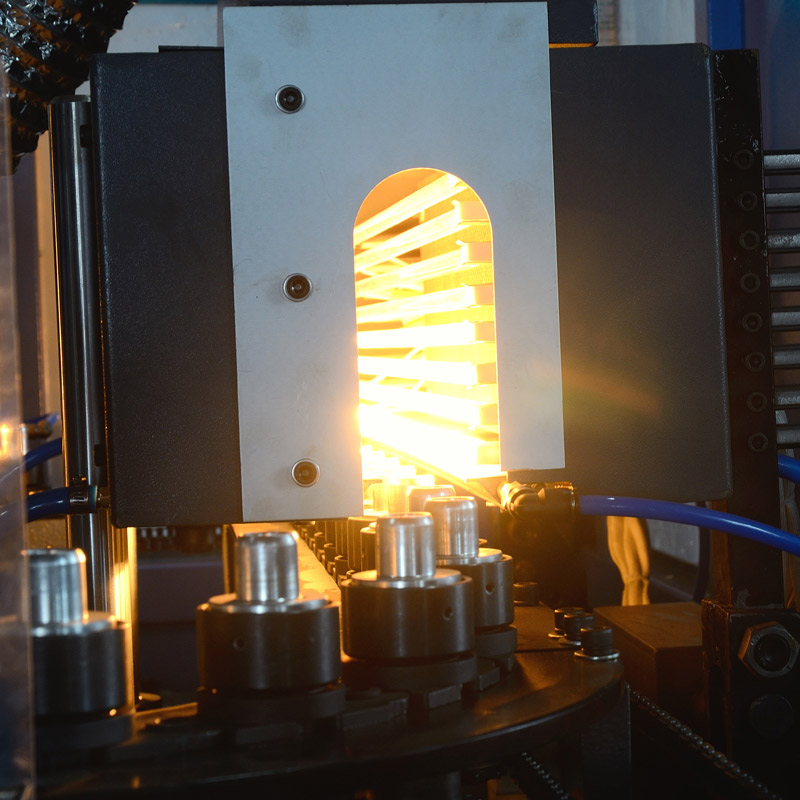
Fault 1: PET bottle is not transparent
Reasons: 1. The heating temperature is too high 2. The heating time is too long 3. The compressed air contains water 4. The injection molding tube itself is opaque 5. The embryo tube design is not suitable 6. The inflation ratio is too small
Exclusion method: 1. Cooling down 2. Shorten heating time 3. Remove water with dryer 4. Improve the quality of the embryo tube, select the materials and improve the dryness of the raw materials 5. Improve the size of the embryo tube 6. Reduce the diameter of the embryo tube
Fault 2: PET bottle appears pearly white
Reasons: 1. The heating temperature is too low 2. The wall thickness of the embryo tube is uneven. 3. The thickness of the embryo tube is too thick, and the temperature is insufficient.
Remedy: 1. Warm up or slow down the revolution speed 2. Improve the quality of the embryonic tube 3. Reduce the thickness of the embryonic tube, or try to raise the outer cover of the heating device to increase the surface temperature of the germ tube.
Fault 3: PET bottle bottom nozzle position shift
Reasons: 1. The blowing time is too early. 2. The stretching rod is not down. 3. The stretching rod is offset from the center line of the bottle shaft. 4. The wall thickness of the embryo tube is uneven or the injection density is uneven. 5. Uneven heating.
Remedy: 1. Delay the blowing time or increase the stretching speed of the stretching rod 2. Adjust the position of the magnetic pole switch 3. Adjust the position of the stretching rod 4. Improve the quality of the tube. 5. Improve the heating condition, or check whether the rotation of the tube is not a problem.
Fault 4: PET bottle wall thickness is uneven
Reasons: 1. The position of the stretching rod is not in the center of the embryonic tube 2. The blowing hole is asymmetrical, the aperture is not the same, the stretching ratio is too low or the inflation ratio is too small. 4. The embryo tube does not rotate in the heating furnace. 5. The wall of the embryonic tube Uneven thickness or uneven injection density
Remedy: 1. Adjust the position of the stretching rod 2. Adjust the position and aperture of the blowing hole 3. Increase the stretching ratio or inflation ratio 4. Check the rotation device 5. Improve the quality of the embryo tube
Fault 5: The upper part of the bottle is too thick
Reasons: 1. The upper temperature is too low. 2. The position of the vent hole of the mold is too far from the upper part. 3. The draw ratio is too low. 4. The upper part of the bottle is too low. 5. The stretching rod is too slow.
Remedy: 1. Warm the upper part 2. Adjust the position of the vent hole 3. Increase the draw ratio 4. Change the shape of the bottle 5. Adjust the speed of the stretching rod
Fault 6: The bottom of the bottle is too thin
Reasons: 1. Start blowing time too early 2. Bottom temperature is too high 3. The bottom of the embryo tube is too thin
Remedy: 1. Delay the start of blowing time 2. Lower the bottom temperature 3. Increase the thickness of the bottom of the tube
Fault 7: The bottle mold line is obvious
Reasons: 1. The mold clamping pressure is not enough. 2. The sealing time is too early. 3. The mold problem. 4. The size of the embryonic tube mouth does not match the mold.
Remedy: 1. Increase the clamping pressure, adjust the clamping struts angle (<5 degrees) 2, move the clamping position switch position 3, repair the mold or check the mold assembly position, such as whether the guide column is loose, or Whether the mold is not pressed 4, repair the mold mouth matching position
Fault 8: The bottom of the bottle or the bottleneck is rolled up and accumulated
Reasons: 1. Delayed blowing time is too long. 2. One roll, one is good. 3. The temperature at the material is too low. 4. The air pressure is unstable, which affects the falling speed of the stretching rod.
Remedy: 1. Shorten the time of blowing or reduce the speed of the stretching rod. 2. Reduce the volume of the side of the bottle. 3. Increase the heating temperature of the tube. 4. Add the gas tank to the operating gas source, or Shorten the gas supply line
Fault 9: stretched perforation at the bottom of the bottle
Reasons: 1. The temperature is not enough, there is no penetration. 2. The delay time is too long. 3. The stretching ratio is too large. 4. The bottom of the embryo tube is too thin. 5. The stretching head is too sharp.
Remedy: 1. Warming 2. Shorten the delay stretching time 3. Reduce the stretching ratio 4. Improve the design of the bottom of the embryo tube 5. Round the stretching head
Fault 10: Bottom blasting
Reasons: 1. Delayed blowing time is too short 2. Delayed mold opening time is too short 3. Temperature is too high 4. Exhaust valve does not work
Remedy: 1. Lengthen the time of blowing or increase the speed of the stretching rod. 2. Lengthen the time of opening the mold. 3. Cool down. 4. Clean the exhaust valve with gasoline.
Fault 11: The bottom of the bottle is not full
Reasons: 1. The temperature at the bottom of the bottle is too high 2. The vent hole at the bottom of the mold bottle is insufficient or uneven 3. The stretching rod is not at the bottom 4. The design of the stretching head does not conform to the shape of the bottom of the embryo tube 5. The blowing pressure is less than 6 The blow valve has a flow rate of less than 7, and the bottom curve of the bottle is poorly designed.
Remedy: 1. Reduce the temperature at the bottom of the heating zone or lower the temperature of the bottom of the tube with a damp cloth 2. Increase the number of vents and make it evenly distributed. 3. Adjust the stretching rod to the bottom of the bottle 4. Replace the stretching head 5. Increase the blowing. Air pressure 6, clean the blow valve with gasoline 7, increase the bottom curve of the bottom line design
Fault 12:1, if it is in a certain orientation relative to the root of the embryonic tube, it is the cause of uneven thickness of the tube. 2. If the mold clamping line is in a certain orientation, it is the mold exhaust problem. 3. The heating of the tube Uneven 4, poor design of the bottom of the mold
Remedy: 1. Improve the thickness of the embryo tube 2. Improve the vent hole at the bottom of the mold 3. Improve the heating conditions 4. Improve the bottom design
Fault 13: Blowing machine has no power indication
Reasons: 1. No power in the socket, 2 in the fuse, 3 in the line, 4 in the safety emergency, 5 in the emergency, 5 in the power switch, and 8 in the indicator light. 7. Is the indicator circuit damaged? Close up
Remedy: 1. Check whether there is power in the socket, whether the leakage switch is tripped, check whether the circuit is short-circuited, then replace the fuse 3, connect the connector 4, open the emergency safety 掣 5, and the power switch is in the ON position. 6. Replacement instruction Light 7, close the circuit breaker
Fault 14: No sealing and stretching action
Reasons: 1. The mold clamping stroke is not in place 2. The mold clamping stroke is broken. 3. The wire is disconnected. 4. The delay time is delayed. The relay is damaged. 5. The lift solenoid valve and the tension solenoid valve are damaged. 6. The cylinder inlet and exhaust throttle valves Block or shut down 7. Corresponding solenoid valve failure 8. Delay extension time is set to "0"
Remedy: 1. Move the mold block 2, replace the mold switch 3, connect the wire 4, replace the time relay 5, replace the solenoid valve 6, check the hole position, ensure the smooth flow 7, check the relevant solenoid valve 8, delay The stretching time setting must not be less than "0"
Fault 15: The disc does not turn
Reasons: 1. The fuse is broken, the disc does not rotate. 2. The AC contactor and the thermal relay are damaged. 3. The motor is out of phase (嗡嗡)
Remedy: 1. Use a multimeter to block (R × 1) to measure the fuse resistance. If it is 0, it means good; if it is ∞, it means it is broken. 2. Use the multimeter ACV250 to measure the voltage across the AC contact coil. If it is 0, measure the voltage between the upper end of the AC contactor coil and the thermal relay (96). If it is 220V, the thermal relay is damaged or overloaded. Rejection line
Fault 16: Alarm sounds
Cause: The main motor current is too large, the thermal relay overload current protection is off.
Remedy: Check motor fault or adjust thermal relay overload current
Fault 17: Air switch trip
Reasons: 1. Short circuit of fire line and voltage regulation circuit 2. Burned out motor
Remedy: 1. If the switch is closed, the heating air switch will be disconnected first, and then re-closed. If it jumps again, it means that the main line has short-circuit grounding, and the air switch is closed one by one. When it is closed, it jumps. , it means that there is a problem with one of the voltage regulating circuits of the air switch, and then check one by one. If the motor starts to trip, it indicates that there is a problem with the motor branch.
Fault 18: The lamp is not lit
Reasons: 1. The voltage regulator circuit is damaged. 2. The lamp filament is broken. 3. The thyristor is damaged or broken. 4. The lamp is broken.
Remedy: 1. Use the multimeter ACV250 file to measure the voltage at both ends of the lamp tube. If there is 220V, the lamp filament is broken, remove it, and check with the multimeter R×1 file. 3. If it is "0", check the corresponding voltage regulating circuit. First, check whether there is voltage output, and then test whether there is voltage input. If there is input and no output, it is generally thyristor damage or potentiometer desoldering. 4. When adjusting the potentiometer, the indicator light has a light and dark change, which can be explained. The silicon control is intact and it is determined that the lamp is broken.
Fault 19: The stretching rod fails to rise back to the original position after the mold is opened
Reasons: 1. The position of the magnetic pole switch is too low. After the stretching rod reaches the bottom of the stretching position, the piston of the cylinder does not pass the magnetic pole switch. 2. The stretching speed of the stretching rod is too fast.
Remedy: 1. First manually raise the stretching rod to the original position, and then adjust the magnetic pole switch to a higher position to ensure that the magnetic pole switch can sense the piston 2 when the stretching rod is stretched to the bottom of the position. The screw of the one-way throttle joint below the cylinder reduces the speed at which the stretching rod descends. Pay attention to changing the speed of the stretching rod, which may affect the blowing effect. The time setting of the “delay blowing” can be adjusted appropriately. , to make a cooperation, to achieve the desired effect of blowing when the stretching rod reaches the bottom of the bottle.
Fault 20: The clamping cylinder emits a friction sound
Reason: The bottom of the clamping cylinder of the clamping cylinder lacks lubricating oil
Remedy: Combine the movable connecting rod at the bottom of the mold cylinder with lubricating oil
Fault 21: Explosion in the mold when blowing
Reasons: 1. The sealing pressure is not enough. 2. The sealing rubber gasket has cracks or loss. 3. The sealing solenoid valve is faulty. 4. The unsafe exhaust pressure is released and the mold is opened. 5. The power failure in the middle. 6. The silencer is blocked by dust.
Remedy: 1. Seal the area of the cylinder face to increase the sealing pressure, or increase the sealing pressure, but be careful not to exceed 10KG/CM2 2. Replace the sealing rubber gasket 3. Check the sealing solenoid valve 4, eliminate the exhaust valve failure, or Increase the delay of mold opening time, or check if the mold clamping device is faulty. 5, improve the power supply system 6, with diesel cleaning silencer
Fault 22: The embryo can not rotate
Reasons: 1. The fuse is blown. 2. The rotation motor is faulty. 3. The bearing of the embryo holder is damaged. 4. The governor is faulty.
Remedy: 1. Replace the fuse 2. Check if the self-rotating motor chain is too tight, or if there are other faults. 3. Replace the bearing. 4. Check if the governor is normal.
Clamp pin break
Cause: The outer angle of the connecting rod, the crank arm and the clamping cylinder is less than 180 degrees, the clamping speed is too fast or the intermediate rotating nut fastening nut is not tightened to collide with the cylinder fork in the middle.
Solution: adjust the distance so that the angle of the clamping cylinder is greater than 180 degrees, but it does not require expansion when blowing the bottle (meaning that the distance of the connecting rod is not adjusted when blowing, so the mold is separated when the high pressure gas is introduced). The distance will not only affect the capacity of the product, but also directly affect the quality of the product).
Oil mist clogging
Cause: The machine has not been turned on for a long time, and the oil is too strong.
Solution: Change the oil and clean the oil mister.
Butter tube burst
Cause: The oil is forcibly oiled when there is air in the butter tube, and the seal screw is too tight. The butter is hardened when it is not turned on for a long time.
Solution: Lightly press the oil diluted with oil and butter.
Solenoid valve blockage
Cause: The compressed air is not clean, no lubrication or long-term oil-free work causes the seal to wear.
Solution: Change the sealing ring and disassemble the solenoid valve with alcohol.
Cylinder seal burst
Cause: The compressed air is not clean, there are impurities in the cylinder or dry friction under long-term oil-free conditions.
Solution: Replace the seal with a new one.
After pressing the mold button in the semi-automatic state, the machine does not clamp
Cause: The mold clamping electric eye is not correct, and the intermediate relay of the mold clamping solenoid valve is burned out.
Solution: Correct the clamping eye and replace the new relay switch.
Blowing machine leaks at the seal when blowing
Cause: The sealing ring is broken, and the sealing tube or sealing cap is loose.
Solution: Replace the Ф26×1.65 sealing ring, tighten the sealing cap and fix it.
The blower is slow and slow when stretching the bottle while blowing
Cause: The operating air pressure is less than 8kgf/cm2, the tension of the piston ring is loose, and the resistance of the air leakage affects the speed of the stretching rod. The dry friction of the cylinder is oil-free.
Solution: Check the air source (air compressor), replace the seal ring, add cylinder oil to the cylinder to ensure lubrication.
The small hole of the high pressure regulating valve has air leakage
Causes: 1. When the air supply switch is turned on, the opening speed is too fast. 2. The high pressure valve core is broken. 3. The gas path is not clean, resulting in too much internal oil.
Solution: 1. Turn off the air supply switch, drain the compressed air, then screw the pressure regulator to the loosest position, then re-regulate the air. 2. Turn off the air supply switch, drain the compressed air, then screw the pressure regulating valve to the loosest position, unscrew the pressure regulating valve, clean it with alcohol, install it after cleaning, and then adjust the pressure by ventilation. 3. Replace the high pressure valve core.
The blow molding machine has a blow molding phenomenon when blowing
Causes: 1. Stretching and sealing of the trachea. 2. The crank arm connecting rod is not adjusted well.
Solution: 1. Check the trachea and replace the wrong trachea. 2. Generally, this situation is caused by the tightness of the crank arm, which must be readjusted.